You can print labels from the Customers, Suppliers, and Stock modules onto your label stationery.
You can:
-
Check and amend the document settings so the label text fits the stationery.
-
Change the text that appears on the labels.
Watch a video
Set up labels in Report Designer (video)
How to locate your labels
Open: ![]() Tools > Run Sage Report Designer
Tools > Run Sage Report Designer
-
From the File Explorer section, open defaults > labels.
-
Choose the labels you want to use.
For your customers and suppliers, there are two versions of the label files to choose from; single sheets or a Continuous version for dot matrix printers.
Label filename Description Customer Label (Single)
Customer Label (Continuous)
Prints a label for the address on the customers record and shows:
- Company name
- Company address
Supplier Label (Single)
Supplier Label (Continuous)
Prints a label for the address on the suppliers record and shows:
- Company name
- Company address
Stock Barcodes Prints a label for the barcode on a stock item and shows:
- The barcode
- The barcode as a number
- The stock item code.
Line up labels with label stationery
Some label sizes are already available in Report Designer. If you're using one of these, you can choose the label size you require. If your label size is not available, you'll need to set up a custom one to fit the labels you're using.
Check the paper size and orientation
Open: File > Page Setup.
-
Check the paper size.
-
Choose whether you're labels are Portrait or Landscape.
Use a preset label size
Open: Format > Labels and Forms
-
Select your Preset label size from the drop-down list.
If you're not sure, check your label dimensions
Laser label dimensionsPreset Label Size No Across No Down Dimensions
mm
Dimensions
Inches
Sag0661 3 7 70 x 38.1 2.75 x 1.5 L7160 Address 3 7 63.5 x 38.1 2.5 x 1.5 L7161 Address 3 6 63.5 x 46.5 2.5 x 1.8 L7162 Address 2 8 99 x 33.8 3.9 x 1.33 L7163 Address 2 7 99 x 38.1 3.9 x 1.5 L7164 Address 3 4 63.5 x 71.9 2.5 x 2.8 L7165 Parcel 2 4 99 x 67.7 3.9 x 2.6 L7166 Parcel 2 3 99 x 93.1 3.9 x 3.6 L7167 Shipping 1 1 199.5 x 289 7.85 x 11.37 L7168 Shipping 1 2 199.5 x 143.5 7.85 x 5.65 L7551 Clear Address 5 13 38.1 x 21 1.5 x 0.83 L7562 Clear Address 2 8 99 x 33.8 3.9 x 1.33 L7563 Clear Address 2 7 99 x 38.1 3.9 x 1.5 L7565 Clear Address 2 4 99 x 67.7 3.9 x 2.66 L7651 Mini Address 5 13 38.1 x 21.1 1.5 x 0.83 L7654 Video Tape Face 2 6 76.2 x 46.5 3 x 1.83 L7654 Video Tape Spline 1 16 144.7 x 16.9 5.7 x 0.66 L7655 Audio Cassette 2 6 88.9 x 41.9 3.5 x 1.65 L7656 35 mm Slide 4 21 45.9 x 11.1 1.81 x 0.44 L7663 5.25 Inch Diskette 1 8 119.3 x 33.7 4.7 x 1.32 L7664 3.5 Inch Diskette 2 4 69.9 x 71.9 2.75 x 2.83 L7701 Lever Arch 1 4 192 x 61.9 7.55 x 2.43 L7702 Lever Arch 1 7 192 x 39.1 7.55 x 1.54 Dot matrix label dimensionsPreset label size No across No down Dimensions
mm
Dimensions
inches
Sage 3 8 66 x 36 2.6 x 1.41 EAL 04 Address 1 1 88.9 x 37 3.5 x 1.45 FAB 03 Name Tag 1 1 69 x 36 2.71 x 1.42 OML 099 Diskette 1 1 69.9 x 48.9 2.75 x 1.92 OML 101 Diskette 1 1 102 x 23.9 4.01 x 0.94 OML 102 Address 1 1 102 x 37 4.01 x 1.45 OML 103 Address 1 1 102 x 48.9 4.01 x 1.92 OML 104 Address 1 1 127 x 37 5 x 1.45 OML 105 Shipping 1 1 127 x 48.9 5 x 1.92 OML 202 Address 2 1 102 x 37 4.01 x 1.45 OML 203 Address 2 1 102 x 48.9 4.01 x 1.92 - Click OK.
Set a custom label size
Open: Format > Labels and Forms
-
Select Custom from the Preset label size drop-down list.
-
Click Advanced.
-
Hold your label stationery landscape or portrait as required.
-
Enter the measurements:
Tip: These default to inches. To change to mm, go to Tools > Options > Measurement.
Number Across Enter the number of labels across the page. Number down Enter the number of labels down a page. Left margin Measure the distance from the left edge of the paper to the left edge of the first label
Note: If you are using dot matrix labels, the left edge is the perforation that separates the sprocket holes from the stationery.
Top margin Measure the distance from the top of the paper to the top of the first label. Width Measure the width of a single label. Horizontal pitch This is the width of the label, including any gap between labels. Measure from the left edge of the first label to the left edge of the next label across. Height Measure the height of a single label. Vertical pitch This is the height of the label, including any gap between labels. Measure from the top of the first label to the top of the next label down. -
Click OK.
Change a preset label to print landscape
Make sure you've set your label size first.
Open: Format > Labels and Forms
-
Click Advanced.
-
Swap the Width and Height values. For example
Original value New value Width 2.60 1.4174 Height 1.4174 2.60 -
Swap the Horizontal pitch and Vertical pitch values. For example:
Original value New value Horizontal pitch 2.6771 1.4958 Vertical pitch 1.4958 2.6771 -
Click OK.
Change the information that appears on the label
Add text
Open: Toolbox > Add Text.
-
Click on your label where you want to enter the text.
-
Drag to make the text box the correct size.
-
Enter your text.
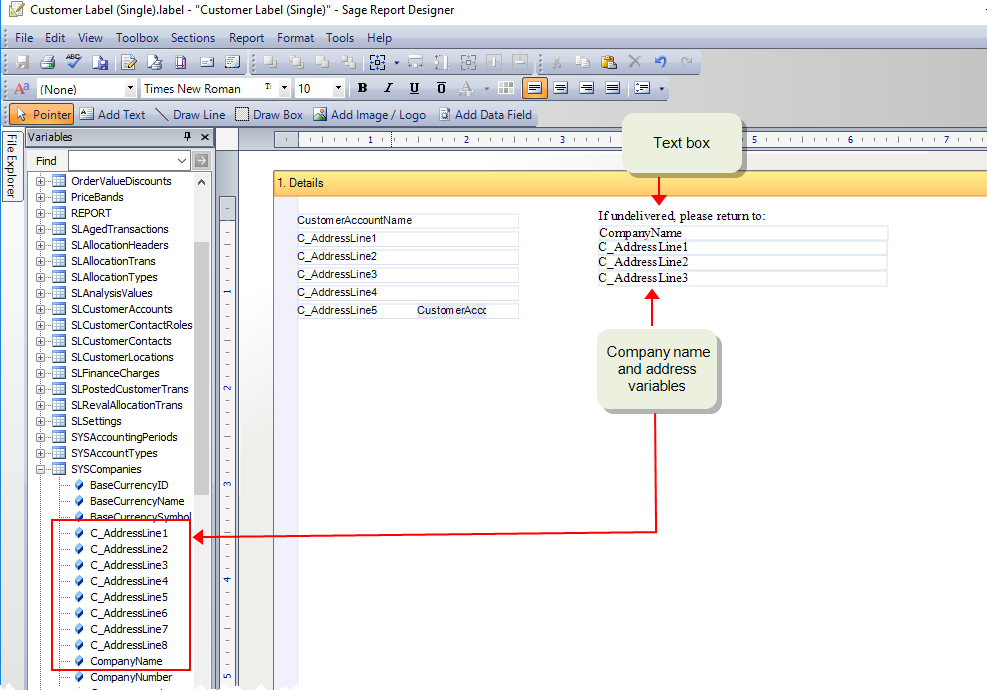
Add extra information from your Sage 200 data
Open: Variables pane (View > Variables)
-
Find the table and field you want to add.
-
Drag the required variable into the relevant position on the layout.
Add an image / logo
Open: Toolbox > Add Image / Logo.
-
Click on your label where you want to add the image.
-
Select Browse my PC or network for an image and click OK.
-
Browse to the image file and click Open.
Change the font, text size, colour etc
-
Select an item or to select everything on the label click Edit > Select All.
-
Open the Properties pane (View > Properties).
-
Select Text Style and click the ... button (
 ).
). -
Set the required style.
Draw boxes
Open: Toolbox > Draw Box.
-
Click on your label where you want to add the box.
-
Drag to make the box the correct size.
-
Change the border size, colour etc from the Properties pane.
Draw lines
Open: Toolbox > Draw Line.
-
Click on your label where you want to add the line.
-
Drag to make the line the correct size.
-
Change the border size, colour etc from the Properties pane.
Change the format for barcode labels
If you use bar codes for your stock items, you record the bar code on the stock record (Details tab) to make stock identification easier. Once recorded, you can print bar code labels for your stock items from Sage 200 (Stock Control > Reports > Catalogue > Stock Barcode Labels).
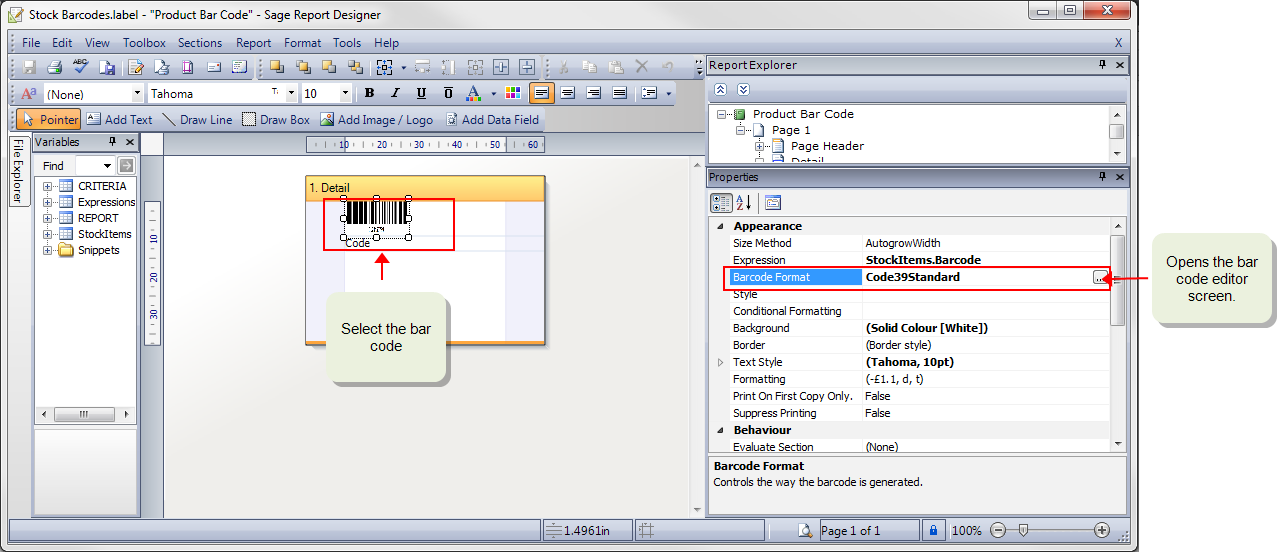
Barcode labels are printed in Code 39 format by default. You can change to different format if required.
Open: File Explorer > Default > Labels > Stock Bar Codes label
-
Select the bar code.
-
In the Properties pane, select Bar code Format and click
 .
. -
Choose the required bar code format and click OK.
-
To save the label file:
-
Go to File > Save As:
-
Save in the Custom > Labels folder.
-
Where to save the new labels
When you save your customised labels, make sure to save it in a new folder. This is to make sure that the original isn't lost. You must also make sure that your have told Sage 200 which type of label file you want to use.
Save the label file
If you have more than one
-
Keep the file name the same as the default file name for the labels.
-
Save your report in the custom folder using same path as the original:
-
custom/labels
-
For example, if you add change the Customer label (Single) the filename will look like this: custom/ layouts /Customer Label (Single).label.
-
Keep the file name the same as the default file name for the labels.
-
Save your report in the same folder as the original but under the company folder and add the
-
<company name>/labels/filename
-
For example, if you add change the Customer label (Single), the filename will look like this: company/ labels /Customer Label (Single).label.
When you generate a report or document Sage 200 first looks for the version in the Company folder, then the Custom folder, and if it does not find one it uses the 'out of the box' version.
Tell Sage 200 which label file to use
You only need to do this for customer and supplier labels, as there is only type of bar code label. In your Sage 200 application:
Open: ![]() Tools > Choose layouts
Tools > Choose layouts
-
Select labels you have amended from the Layout drop-down list:
-
Customer Label
-
Supplier Label
-
-
Click Browse next to the filename.
-
Choose the type of label file you want to use, single or continuous.